An overview of the battle of Gazala, the famous clash in the desert that raged on for days, seen from the axis perspective.
Context
1942 was undoubtedly the most intense and decisive year of the North African campaign, fought by the Italo-German Army (Panzeramee Afrika) and the Commonwealth forces organized in the 8th Army. Operation Crusader, the allied offensive launched in November 1941, had pushed back the Axis forces on the El Agheila frontline but the arrival of new supplies allowed Rommel to launch a counterattack already in January 1942. By the end of February, the Panzerarmee Afrika had reached the new frontline near Ain-El-Gazala. Here the two opposing sides set defensive positions and guns went silent after three months of continuous fighting.
The Axis offensive and initial fightings
The two armies spent the next three months on the defensive and by May they had recovered strength and re-filled their ranks. By that time, Rommel could count on the following forces:
XXI CORPS (Trento and Sabratha divisions plus the the German 15th Schutzen brigade)
X CORPS (Brescia and Pavia divisions)
XX CORPS (Ariete and Trieste divisions)
DAK – “Deutsches Afrika Korps” (15th and 21th Panzer Divisions, 90th light division)
Rommel conceived an offensive plan that envisaged the XXI and X corps launching a faint attack on the Gazala frontline to draw the allied attention. At the same time, he would have moved south with the DAK and XX corps passing around the enemy’s most southern position (the entrenched rocky hill of Bir-Hacheim).
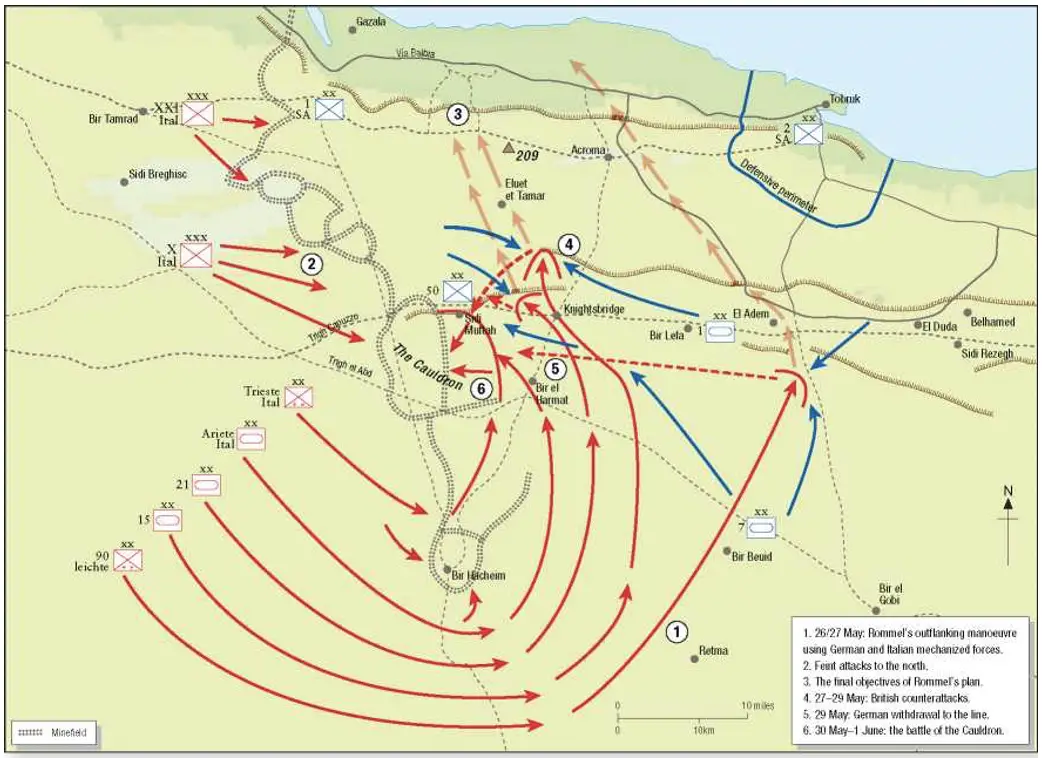
Battle of Gazala map. Image Credit: World History.
This manoeuvre would have put Rommel behind the allied position forcing, in theory, the withdrawal of the enemy infantry and artillery from the Gazala front.
The DAK and XX corps began their movement on the 26th of May, a wide and long formation on five main columns, counting around 10.000 vehicles. The Ariete division could count on 172 M13/40 tanks divided into three battalions (the VIII, IX and X), plus 40 L6/40 and 40 AB41 armoured cars of the scouting units. The Trieste motorized division also could count on the XI tank battalion and the VIII Bersaglieri armoured car battalion. Soon the Trieste diverted its course, positioning itself northwest of the Bir-Hacheim position and trying to open a gap in the minefields. The Ariete pushed southwards together with the German mobile divisions and, at 6:40 of the 27th May, attacked the 3rd Indian motorized brigade at Rugbet el Atasc, south-east of Bir-Hacheim. The brigade was overrun by the VIII and X tank battalions of the Ariete with minor losses.
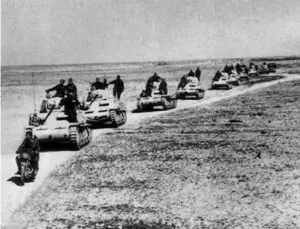
Ariete Tanks on March
However, due to a navigation error, the IX battalion moved too much northwards and incurred in the entrenched position of Bir-Hacheim, defended by 4000 men of the Free-French brigade and surrounded by minefields. At 8:30, the battalion came under heavy fire but pushed forward nevertheless, colonel Prestimone (commanding the battalion) had its tank immobilized by a mine and soon jumped on a second tank that was also hit moments later. Prestimone then jumped on a third tank that was immobilized 80 meters from a French battery. He was taken out of the burning tank and captured, later greeted by the French commander. At 10:15, the IX battalion withdrew with 31 tanks lost (18 on mines) and managed to reunite with the rest of the Ariete.
More to the east, the DAK pushed north and encountered commonwealth armoured units in a clash that caused heavy losses on both sides. This was the first encounter between axis tanks and the US-built M3 Grants. Allied counterattacks continued in the afternoon, causing further depletion of the DAK which counted 109 operational tanks by the evening.
On the 28th, with fuel and ammunition running low and the overstretched supply line passing south of Bir Hacheim, Rommel ordered the X and the XXI Corps to attack the Gazala frontline, attempting to open a gap in the enemy lines and let the supplies go through. The Trieste had already begun such operation the day before and by the morning of the 28th clears a gap in the minefields north of Bir-Hacheim and re-joining with the Ariete, letting some vital supplies to pass through, reaching also the DAK. On the 29th, the Brescia and Pavia divisions opened new gaps in the minefields, north of the entrenched position of Got-el-Ualeb held by the 150° British brigade, while Rommel decided to concentrate his scattered forces in an area north of Bir-Hacheim and east of the minefields. This area will be quickly called “the Cauldron”.
The Cauldron

Bersaglieri firing an anti tank rifle
Waiting for the arrival of new supplies through the minefields, Rommel deployed his forces on the defensive, preparing for the inevitable counterattack of allied armoured units. Such counterattack came on the 30th but was repelled by a formidable anti-tank barrage of German flak and Italian 90mm guns, that caused heavy losses. On the 31st, Rommel ordered the attack on the Got-el-Ualeb strong point, a position from where the British threatened the supplies passing through the gap in the minefields. The Trieste and the 15th Panzer division carried the attack while the Ariete and the 90th light division covered their back from any allied counterattack coming from the north or the east. On the 1st of June, the British brigade was overrun, and Rommel began to plan the assault on Bir- Hacheim, the last enemy position threatening the influx of supplies. Units of the Trieste and the 90° light division progressively moved southwards while the Ariete and the rest of the 15th and 21st Panzer divisions repelled the British assaults from the 5th to the 7th June (Operation Aberdeen). On the 8th, the Ariete stood once again the attack of the 7th British armoured division, thus allowing for the transfer of the 15th Panzer to Bir-Hacheim. During these days, the British lost more than 200 tanks, the non-concentration of all available forces to crush the enemy and failures in coordinating attacking infantry and tanks probably saved the Axis units in the Cauldron, inferior in numbers and equipment.
Bir Hacheim
The big assault on Bir-Hacheim begins on the 6th of June, with the Trieste and 90th light division assaulting the French positions, constantly hammered by Stuka dive bombers. On the 8th of June, the first sections of the perimeter were penetrated and the allies began to plan the evacuation. The free French forces mounted a brave and effective resistance, inflicting considerable casualties to the attackers, however, the situation became more and more unsustainable, especially due to the constant air bombardment. In the early hours of the 11th June, 2.600 surviving defenders break through the lightly defended axis lines southeast of Bir-Hacheim and re-join with British mobile units.
Epilogue
On the 12th of June, with his rear and flanks secured, Rommel gathered his forces for the final push towards the sea, aiming to trap the allied divisions deployed on the Gazala line. On the 14th of June, facing a dire situation and having lost most of its tanks, the command of the 8th army ordered the withdrawal from the Gazala line. The attrition and fatigue caused by 14 days of continuous fighting slowed down the Axis advance, thus allowing the allied troops to escape the encirclement. On the 15th of June, the Italian X and XXI corps deployed on the Gazala line pushed forward, fighting the rear-guards of the retreating allied forces, which however managed to escape to fight another day. That same evening, with the occupation of Sidi-Rezegh, Acroma and El-Adem, the Battle of Gazala was over and Tobruk was virtually encircled by the Axis army.
Rommel had gained a decisive victory, reinforced soon after by the fall of Tobruk. However, his bold plan came very close to defeat, he was saved by the slow and uncoordinated reaction of the 8th army, but also by the Italian divisions that opened gaps in the minefields, allowing for the supplies to pass through.
Sources
Montanari, M. (1989). Le operazioni in Africa settentrionale, Volume III: El Alamein. Roma: Ufficio storico dello stato maggiore dell’esercito.
Rebora, A. (2016). Carri Ariete combattono. Prospettiva editrice.