The Elite Frogmen of the Decima Flottiglia Mas
The Decima Flottiglia MAS. Perhaps no other Italian military outfit during the Second World War was as respected and feared as this elite group of naval commandos. During their reign of terror directed at Allied Naval and merchant vessels, Decima Flottiglia MAS (10th Light Flotilla), destroyed over 200,000 tons of Allied shipping. The pinnacle of their success came with the Decima Mas attack on Alexandria in December of 1941. This mission, carried out by six well-trained commandos, would send two British battleships to the harbor bottom and help temporarily swing the balance of Mediterranean naval power to the side of the Axis.
Related: Decima MAS: Italian Frogmen
British Presence in the Mediterranean
By late 1941, the Battle for the Mediterranean was, for the most part, a battle of the convoys. Axis forces were desperately trying to supply their armies fighting in North Africa; the British in turn were attempting to stop them from doing so. The only chance the Axis could achieve victory in North Africa would be if the ammunition, material, fuel, and men sent from Italy across the Mediterranean reached their ports in Libya and Tunisia in significant numbers. Standing in the way from accomplishing this task was the formidable power of the British Mediterranean Fleet. The British maintained two main naval bases in the Mediterranean from which they looked to wield their power and control the shipping lanes. In the west, there is Gibraltar, and from the eastern end, their harbor in Alexandria. From Malta in the ‘center’, the RAF unleashed attacks of their own against Axis shipping.
The Axis was faced with both the immense challenge of providing protection for their own supply convoys and to also mount attacks against British convoys making their own runs to supply their basses. The navies of Mussolini and Hitler were in a death struggle with the larger British force, and by the last months of 1941, they needed to inflict serious damage to the Royal Navy in order to secure any chance at ultimate victory. Over a five-week period starting in mid-November they would do just that.
British Navy Setbacks
On 13 November 1941 in the waters east of Gibraltar, the German U-boat U-81 launched a successful torpedo attack on the British Aircraft carrier Ark Royal. British rescue crews and support ships raced to the aid of the stricken carrier and did their best to keep the Ark Royal afloat. But these sailors efforts would be in vain. The day following the attack, the largest aircraft carrier in the Mediterranean would sink to the bottom of the sea.
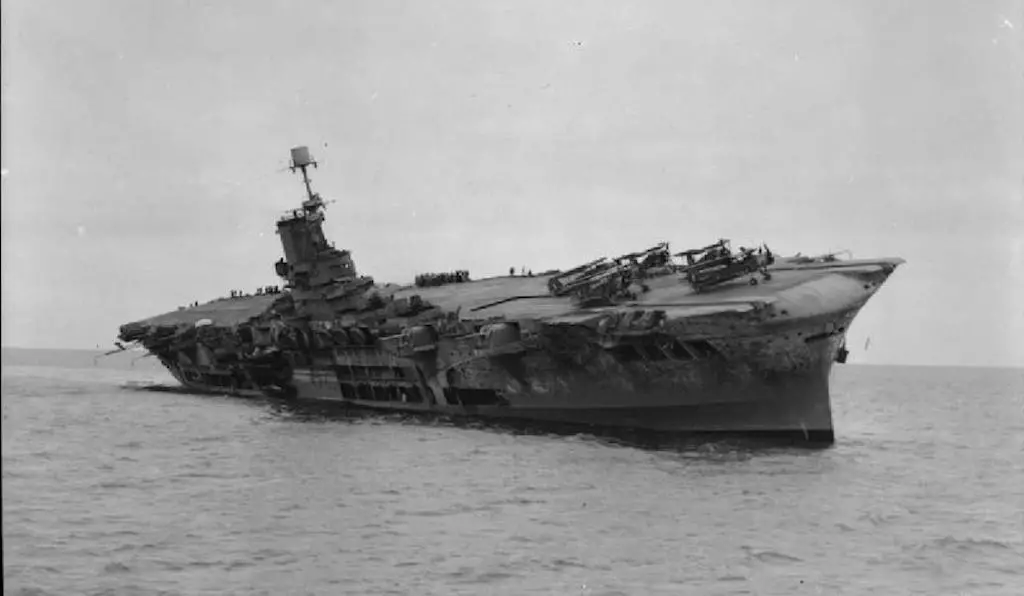
HMS Ark Royal lists severely before finally sinking.
Just twelve days later the British would suffer another major blow, further reducing the power of their fleet. On November 24th, the battleships HMS Queen Elizabeth, HMS Barham, and HMS Valiant along with 8 destroyers, set sail from their base in Alexandria on a mission to block Axis supply routes to Africa. The following day the German U-boat U-331 detected and stalked the convoy. U-331 would score 3 devastating torpedo hits on the Barham from less than 1000 yards moments after commencing her surprise attack. The Barham listed badly, and following a huge explosion sank to the sea bottom taking nearly 900 British sailors to their death.
After these calamitous attacks, the British Fleet was reduced to 2 battleships in the theater. Admiral Sir Andrew Cunningham, commander in chief of the British Mediterranean fleet, would order the Queen Elizabeth and Valiant back to the protective harbor in Alexandria until they could rebuild their forces around them. However, the Italian Navy ( Regia Marina) and in particular Decima Flottiglia MAS, had other ideas.
Planning a Decima Mas Attack on Alexandria
The Regia Marina had their eyes on an attack against Alexandria since the war began for Italy. Two previous attempts to send naval commandos to assault the harbor ended in failure when the submarines transporting the teams had been detected by the British on their journey to Alexandria. Regia Marina high command would not be deterred from attempting the operation again. The mission was just too important.
In the fall of 1941, RM Cmdr. Ernesto Forza held a high-level strategy meeting with several of his top Decima MAS troopers. He informed the men that he was looking for volunteers for a high profile but dangerous mission and that “return from it is extremely problematical.” In true Decima MAS tradition, every man present offered their service for the operation.
Junio Valerio Borghese
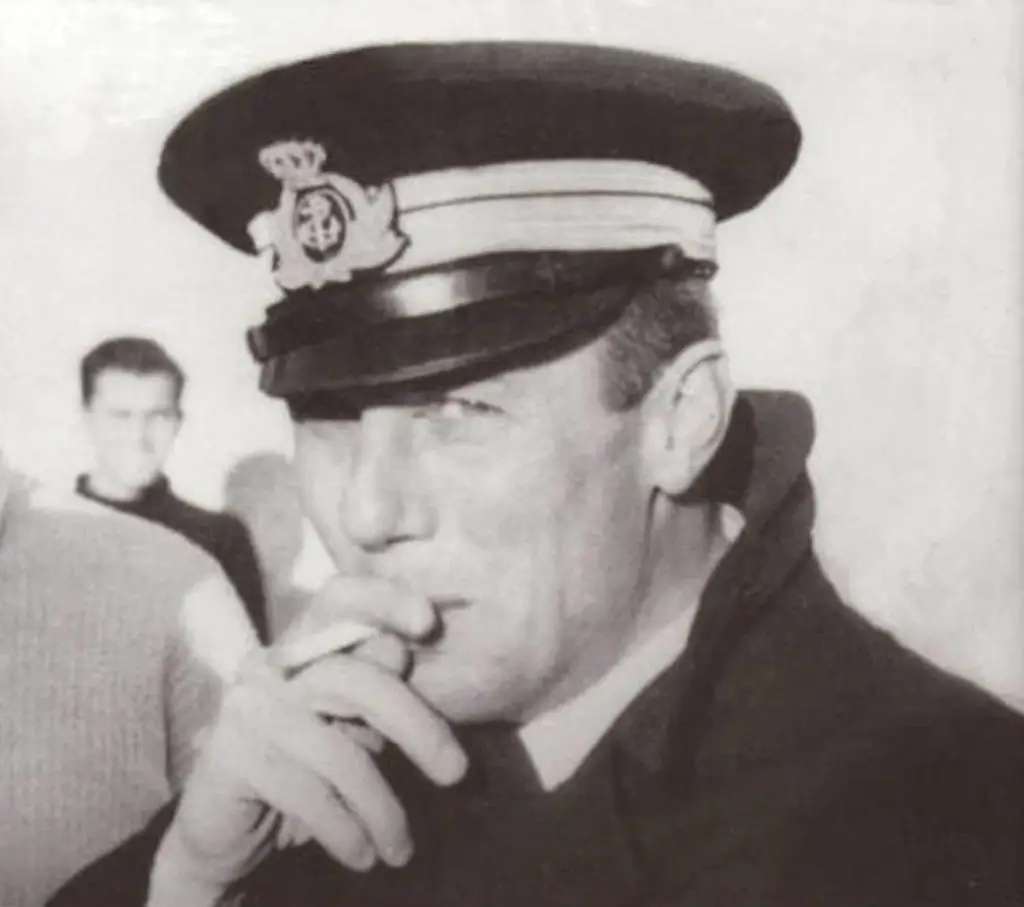
Borghese in the early 1940s.
Junio Valerio Borghese took charge of the new assault on Alexandria, called Operazione EA3. The “3” designated this as the third attack on Alexandria. Borghese recently led the successful commando attacks on the British naval port in Gibraltar, and many felt he was destined for greater things. After the success of the Gibraltar raids, he was promoted to the rank of lieutenant commander. Borghese also became appointed to command the sub-surface unit of Decima MAS. One of the best Italian tacticians of the war, no man was better suited for the mission then Borghese.
Siluri a Lenta Corsa (SLC)
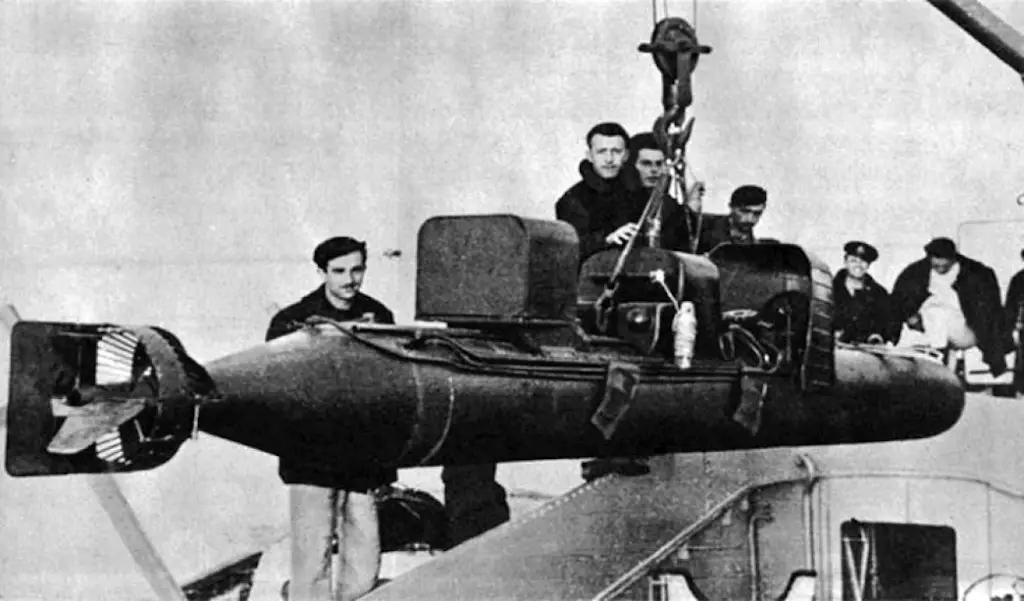
The planned attack on the harbor would be carried out by three two-man assault teams utilizing one of the most inventive weapons of the Second World War; the Siluro a Lenta Corsa, SLC, or as called by its operators “maiales” (pigs). The SLC is a torpedo-like craft manned by a crew of two. The SLC was battery-powered and approximately 22 feet long, with a 660-pound warhead located in the bow. The warhead detached by releasing an airscrew holding it in place. The warhead secured to the bottom of the targeted ship by a magnetic clamp. In the case of a battleship, it attached itself by using a rope run through each of the two bilge-keels located on the underside of the vessel.
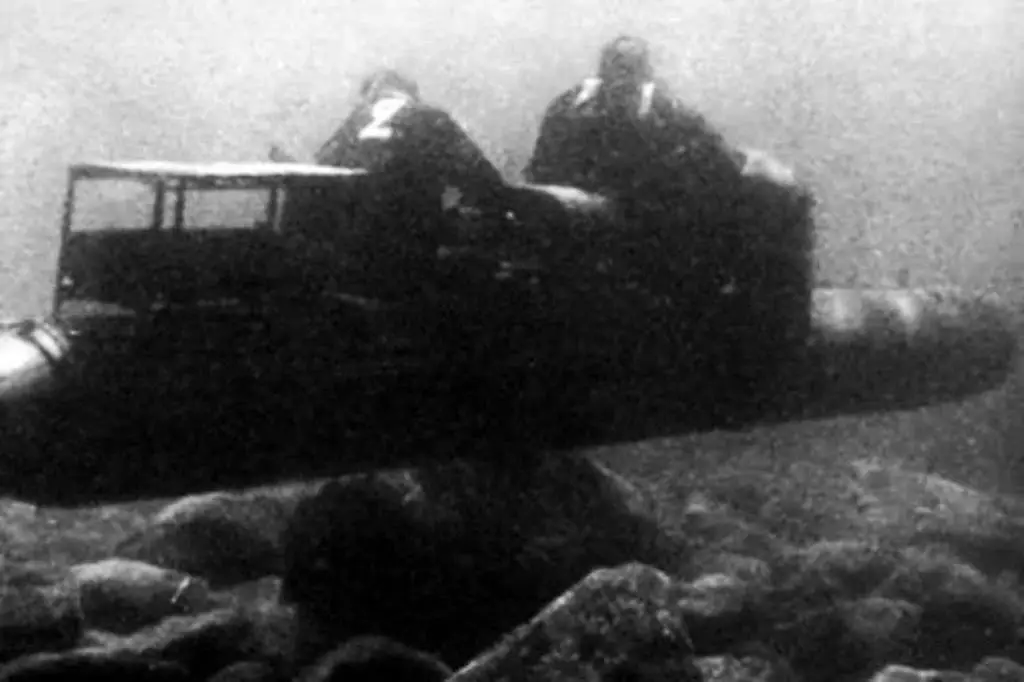
Italian Frogmen of the Decima MAS prepare to strike on a Siluri a Lenta Corsa.
The SLC had a top speed of 4.5 knots and a range close to 25 kilometers. The SLC, often called the Human Torpedo, submerged up to a depth of about 100 feet.
Decima Mas Frogmen
The commandos, known as “Frogmen”, donned rubberized suits as well as oxygen tanks to carry out their missions below the surface.
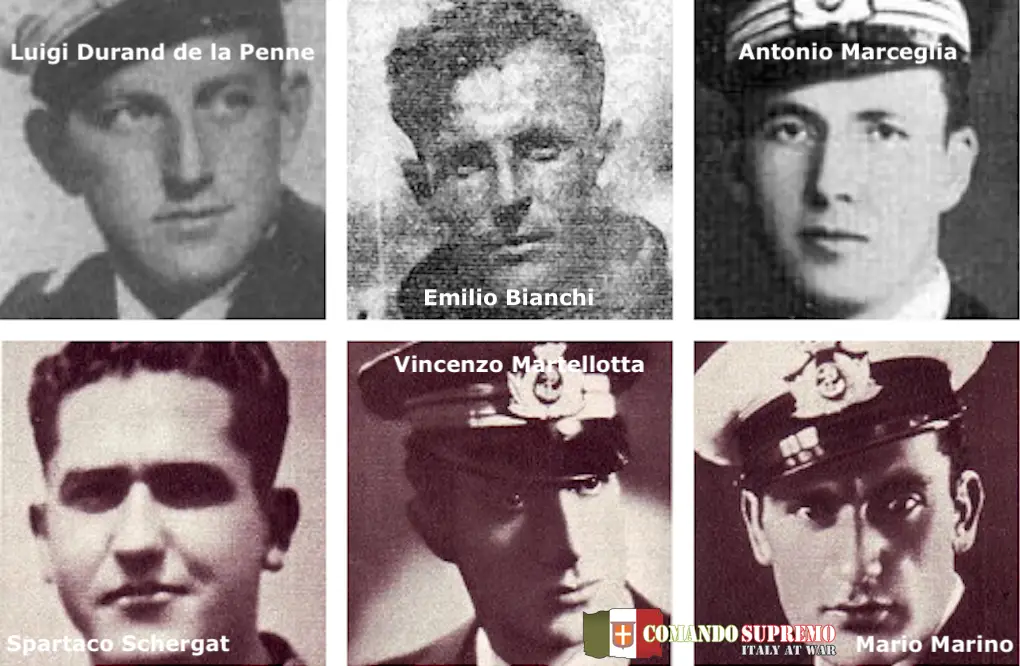
The six frogmen who took part in the Decima Mas attack on Alexandria.
The Frogmen conducted their specialized training for the attack at their base in La Spezia. The Decima MAS commandos were in top physical shape, and also highly trained in explosives and small arms. The target mission date of December 17th was not far off, so the training and study the men put in was intense. Comprising the three teams were; Lieutenant-Captain Luigi Durand de la Penne and Leading Seaman Emilio Bianchi operating one SLC. Capt. Antonio Marceglia and Leading Seaman Spartaco Schergat made up the second team. The third team of the assault included Capt. Vincenzo Martellotta and Petty Officer Mario Marino.
Planning of Operazione EA3
Navy Intelligence provided the Frogmen a very detailed model of Alexandria harbor to study. Ariel photography, maps, and drawings from informants and Italian agents in Alexandria helped the commandos plan their attack with incredible accuracy. The Frogmen and their support team also spent hours studying meteorological reports and charts showing the different currents and the underwater environment they may find during the mission.
There were three main parts to Operazone EA3. First is the journey itself; the submarine would have to run a gauntlet of British ships and planes from Italy to Alexandria just to reach a disembarkation point for the assault team. The second phase is the attack on the harbor. The last step is the commandos escape from the harbor. The challenge before them, to say the least, was daunting.
Defenses at Alexandria Harbor
Miles and miles of minefields protected the harbor of Alexandria. Six miles from the entrance a separate minefield laden with radio-controlled detonator mines shielded the mouth of the harbor even further. The harbor itself is separated from the Mediterranean by break walls on the eastern and western sides; the 200 meters wide opening in between had been gated by three steel anti-submarine nets that controlled traffic coming in and out.
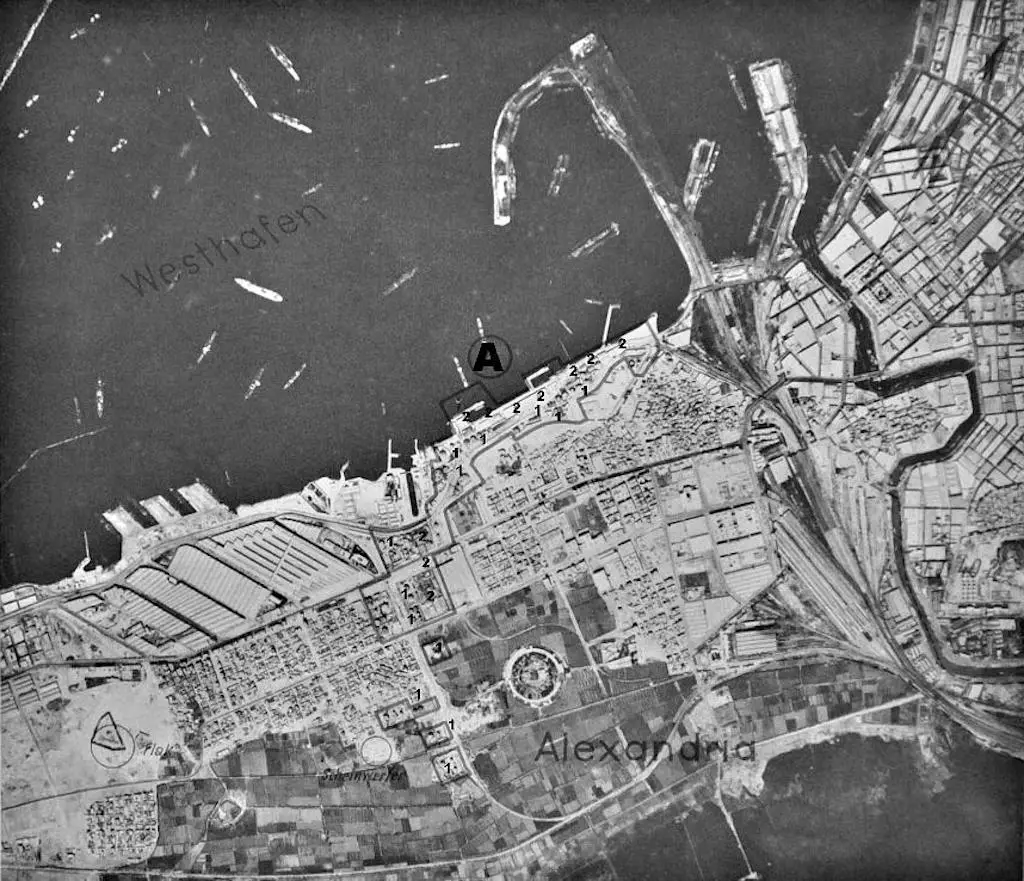
A 1938 German aerial photograph of Alexandria harbor.
Anti-aircraft and costal guns distributed around the perimeter provided the harbor additional protection. Surveillance planes made multiple passes a day, as did patrol boats that randomly dropped depth charges to deter submarines. Searchlights illuminated the port at night, and armed guards walked the break walls and dock. The British seaman always felt safe and secure while in their well-protected harbor. That was about to change; Decima MAS was coming.
Italian Submarine Scire
On December 3rd the Submarine Scire, now with Lt. Cmdr. Borghese as her captain, left La Spezia and headed out to the open sea. The Frogmen already flew ahead to the island of Leros for further training. The Scire rendezvoused with them several days later to continue the journey south. The Scire had been modified to carry 3 large tube-like containers on the hull which held the SLC’s. To help protect the secrecy of the mission, an announcement stated the Scire deployed on a training mission.
A point was made to show the empty tubes on the hull lest British spies grow suspicious. That evening of the 3rd under the cover of darkness, the submarine met up with an Italian ferry-boat at sea where they transferred the SLC’s on to the Sirce. On the 14th, with the Frogmen collected off of Leros and now on board, the Scire changed course and headed south. Alexandria awaited.

The submarine Scirè as it looked on 06 January 1938.
Borghese navigated the Scire on the surface only during the hours of darkness. Travel in the daytime occurred only when submerged. While this reduced the speed at which they could travel, stealth remained the main goal. Extra caution was given to avoid detection at all costs. A determined Borghese ensured that the Scire and her commandos made it to their target this time.
The Scire surfaced on the 18th into the evening darkness. In the distance towered the Ras-el-Tin lighthouse, the predominant landmark for seafaring vessels heading to the harbor. The lighthouse stood for nearly 100 years as a beacon and guide for those seeking protection and anchorage in Alexandria. That night, however, it served to usher in chaos to the port once thought impenetrable.
Deploying the Frogmen
The commandos donned their protective gear and exited through the turret hatch of the Scire. Once outside the sub they made their way to the mounted tubes and pushed their SLC’s free into the sea. With the SLC’s and Frogmen clear, the Scire dove back into the safety of the sea and departed. The commandos were for now on their own. A second submarine had been dispatched to retrieve them after the completion of their raid. The escape plan created for the Frogmen teams’ called for them to make their way onto land, undetected of course, after the completion of their assignment.
Loading SLC “Human Torpedos” on to a submarine.
From there they must steal or hijack a fishing boat or small craft and make their way to the waters off of the city of Rosetta located near the mouth of the Nile. The second sub had been scheduled to meet them there on Christmas Eve, and begin what they hope is a victorious journey home.
Raid on Alexandria Begins
The men of the assault team did not think about Rosetta and escape on the night of the 18th however. Their minds lay focused on the mission at hand, and how much depended on its success. Using the lighthouse as a guide, the Frogmen piloted their SLC’s across the still dark water towards Alexandria. All of the training and studying they put in for the mission would be called upon that night; for their very lives depended on it.
As the teams made their way closer to the harbor, they spotted a patrol boat circling about and dropping depth charges at random intervals. To avoid detection, the men maneuvered the SLC’s close to the western break wall and then slowly made their way towards the mouth of the harbor. The commandos passed within yards of several British sentries who positioned on top of the break wall. The guards, perhaps thinking of home or the card game the night before, did not see or hear the commandos slip right past them. The Frogmen caught their first break on the mission.
A Secure Harbor Gate
The SLC’s made their way to the harbor “gate”, the three rows of retractable steel netting positioned between the break walls. The Frogmen piloted their SLC’s into a dive searching for an opening or perhaps room to traverse under the nets. Unfortunately, no openings could be found and the nets reached almost all the way to the seafloor blocking the way under. To further complicate things, the commandos discovered that explosives had been attached to the cables. The ‘front door’ had been secured quite well.
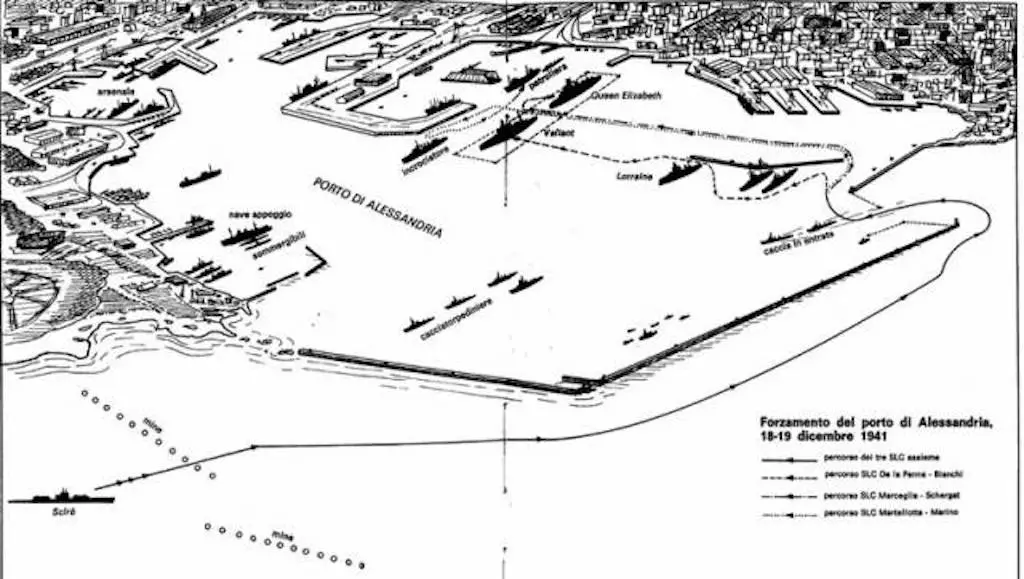
Italian map of the Decima Mas raid on Alexandria Harbor.
The Frogmen were left with the unenviable prospect of having to rise back up to the surface and attempt to lift or pull the SLC’s over the top of the netting. This, of course, greatly increase their odds of being detected. They had little choice, as the harbor presented no other option for them to be able to deliver the explosives to the targets. Now nearly midnight, the commandos were just moments away from moving the SLC’s into position to go over the net when the entire ‘gate’ area became illuminated by floodlights and probing searchlights. In the distance, the distinctive sound of several large ships could be heard as they approached the harbor. As the ships slowly cruised forward, the Frogmen could make out the form of three British destroyers and a troop transport heading to the port to find refuge.
An Opportunity Seized
The ‘gate’ opened to allow access to the harbor for the ships, and the Frogmen quickly capitalized on this unexpected development. The commandos deftly maneuvered their SLC’s behind the last ship in the line, and followed closely in the ships wake right through the ‘front door’. As the Frogmen slipped into the inner harbor undetected, the ‘gate’ closed behind them. Decima MAS just caught their second big break of the mission.
Finding the Targets
Once inside the harbor, the three assault teams split off from each other in search of their assigned targets. De la Penne and Biachi set off for the Battleship Valiant; Marceglia and Schergat made their way for the Battleship Queen Elizabeth, while Martellotta and Marino began their search for their target. As De la Penne’s team made its way past the rows of anchored ships, the Valiant finally came into their view. As the Commandos guided their SLC towards the ship, they encountered a second protective net erected about 15 yards around the target. This forced the Frogmen to lift their vessel over the netting, and once accomplished, they dove to position the SLC under the ship.
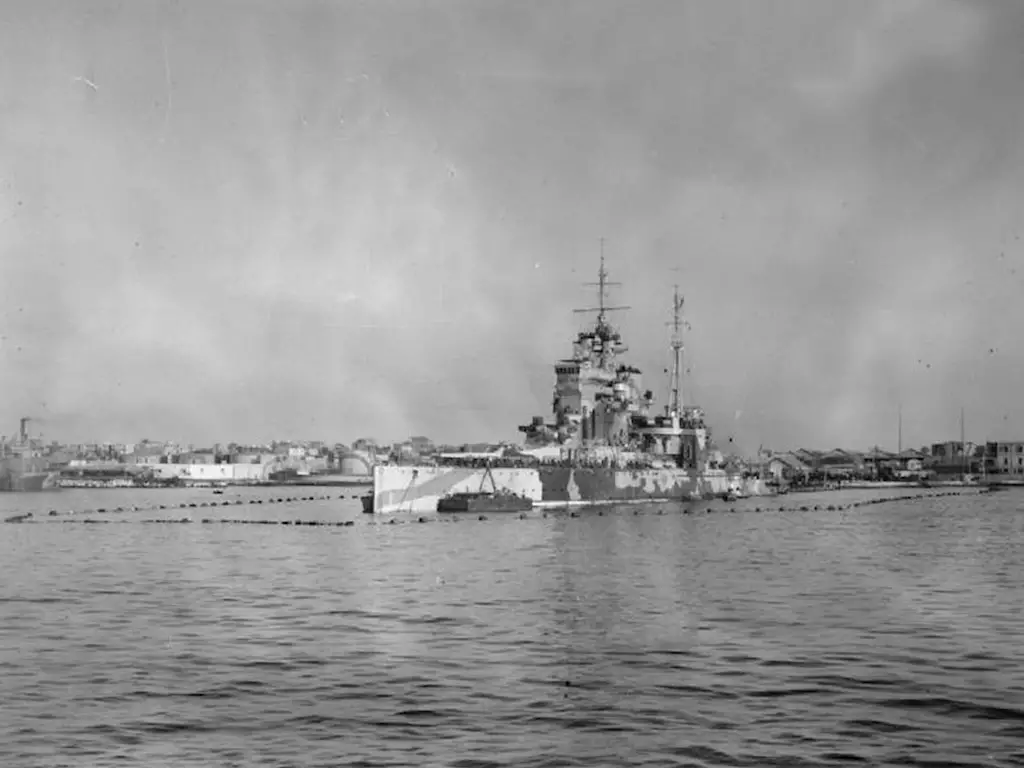
HMS QUEEN ELIZABETH in Alexandria harbor, Egypt. She is surrounded by anti-torpedo nets.
SLC Failure and Setback
Meters from the Valiant however, the SLC suddenly froze up and dropped from underneath the team and immediately sank to the harbor floor. De la Penne followed his partner moments after he dived under the water in an attempt to find and revive the SLC so that it could be attached to the underside of the Valiant. In the murky darkness, De la Penne lost contact with his fellow Frogman but located the SLC. A quick check of the vehicle revealed that a cable from the netting wound itself around the propeller, thus rendering the SLC inoperable. De la Penne later remarked after thinking back on the situation: “We had arrived a few meters from the target, after years of preparation and work, and now it had all come to an end”. This commando, however, was not going to be stopped on his mission that night.
Although the SLC, which weighed close to 1000 pounds armed, partially sank into the muddy harbor bottom, De la Penne managed to drag it underneath the Valiant. He would not be able to attach the charge to the ship itself, but De la Penne was confident that the results would still be effective with the explosives set directly under the mighty ship. Once he armed the device and set the fuse, he headed back up to the surface.
Luigi De la Penne and Emilio Bianchi
As De la Penne broke the surface of the water, he found himself under fire from a British security detail. Moving swiftly through the water he quickly found cover behind a large buoy attached to the battleship. He was glad to see his fellow Frogman Bianchi also taking refuge here. Bianchi’s breathing device failed when he dove looking for the SLC, which forced him back to the surface. De la Penne quickly informed him that he set the explosive and that the clock was running down for the Valiant.
A small British patrol craft moved in behind the Frogmen and took them into custody. To the Frogmen’s horror, they ushered them onto the Valiant to be held and interrogated. The British escorted the commandos to a room in the lower compartment of the ship which served as their makeshift cell. As the door closed behind them their uneasiness increased, for they realized they sat almost exactly over the explosive.
Antonio Marceglia and Spartaco Schergat
The team of Marceglia and Schergat in the meantime made their way to the battleship Queen Elizabeth. The Frogmen dove their SLC under the security net surrounding the massive ship. Attaching and arming the explosive to the bottom of the vessel went smoothly, and the team quickly resurfaced. After insuring the SLC was out of sight from the shore, the commandos exited the water unseen. Once out of the water they made their way stealthily away from the harbor and headed inland under the cover of darkness. Their part of the mission complete, Marceglia and Schergat began their journey to meet up with the get-away sub.
Vincenzo Martellota and Mario Marino
The last team, comprised of Martellotta and Marino, arrived in the area of the harbor that the British aircraft carrier should be anchored. Unfortunately for the commandos, the ship departed for action in the Pacific just the day before. The Frogmen changed their target and made their way over to the 7750-ton tanker Sagona. The team moved fast; the hours of training paying off, and they secured the explosive to the stern of the ship. As the commandos made their way to land to attempt their escape, harbor security spotted and apprehended them. Although two of the three teams had been captured, all of the explosives had been set and armed.
Interrogation of De La Penne
Aboard the Valiant, the British interrogated De la Penne and Biachi several times during the night. Neither one divulged any information on the specifics of their assignment to the British officers interrogating them. Before departing on the mission, De la Penne wrote three letters to his mother. The appropriate one to be sent by the Regia Marina to her depending on the outcome of the assault. One he prepared in case of a fully successful mission, including an escape and return trip back to Italy; another one crafted if captured, and the last one in the event of his death. De la Penne began to believe at the time that the latter described his ultimate fate. After the war, he reflected back on those anxious hours waiting for the explosives to detonate.
It was not easy to control myself in those circumstances and decide whether or not to let myself be destroyed by my own charge. But I held out, especially because I wanted to show the English sailors that Italian sailors were as good as they were.
De la Penne Informs the British Commander
It was approaching six am, about 20 minutes until the charge would detonate. De la Penne called out to his guard and demanded to see the British Commander. They escorted him to the Commander, and De la Penne informed him that the ship will explode shortly and that he should evacuate his crew for their safety. De la Penne still refused to reveal the exact location of the explosive for fear that the Valiant could be moved away from it. They returned De la Penne back to his cell and locked him in. His British guards no longer standing watch below deck with him.
Torpedos Explode in Alexandria Harbor
The seconds counted down by De la Penne in his head. Almost precisely on time the Valiant shook and rocked as the charge below her detonated with an awesome display of force. Seawater poured into the lower compartments as a portion of the superstructure cracked open. De la Penne tossed about and temporally blacked out from the concussion. He regained consciousness as the water poured into his cell. The door to his room blew open, and he made his way up through the ship. British sailors rushed by him in the passageways as confusion ran through the ship. Re-captured by security, De la Penne is once again escorted up to see the Commander. At almost the precise moment he arrived on the bridge, the Queen Elizabeth, anchored within sight of the Valiant, is struck by a powerful explosion. The charges attached to her underside worked perfectly.
The explosion beneath the Queen Elizabeth sent debris and oil flying high into the early morning sky. The lights aboard the ship flickered on and off. Sailors in the lower compartments scrambled topside to avoid the incoming water. A few moments after the explosion on the Queen Elizabeth, the oil tanker Sagona jerked violently up and then back down in the water as it also now fell victim to the Frogmen and their charges. The British destroyer Jervis Bay, positioned nest to the Sagona taking on fuel, also sustained heavy damage in the blast.
The Valiant and Queen Elizabeth Sink
The mighty warships, each with holes blown into their hulls, slowly started their descent down into the water. There was nothing that the British fire control teams could do to stop them from sinking; the damage was just too extensive. The ships, however, had been spared a watery grave. Both sank to the bottom of the harbor, but due to the shallowness of the port neither completely submerged. The ships settled on an even keel, and their decks remained above the waterline.
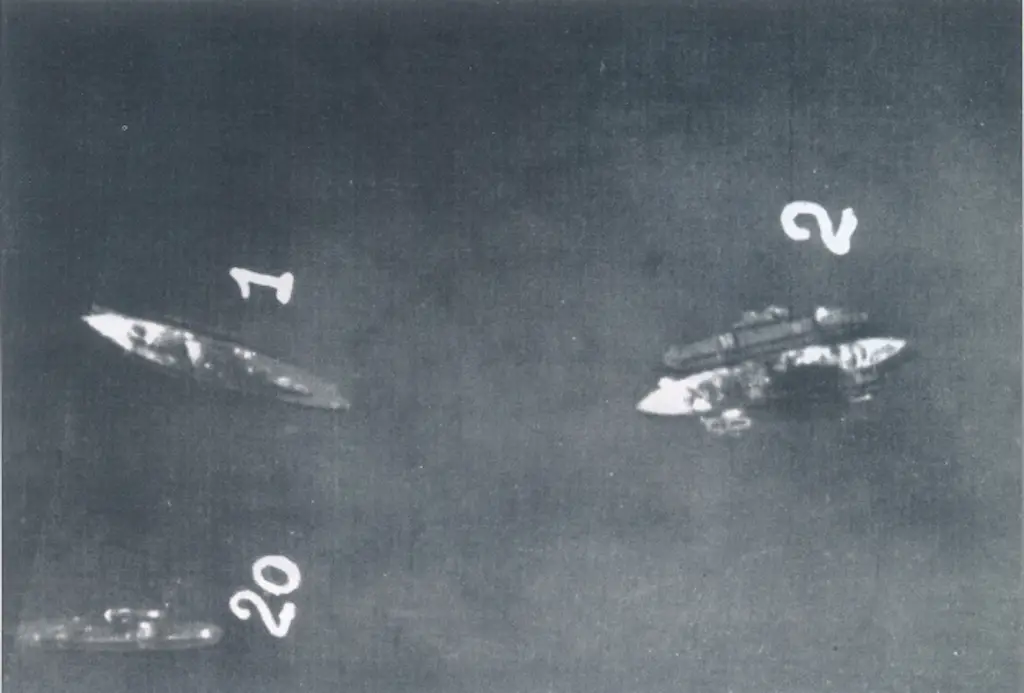
Following the Decima Mas Attack on Alexandria, this aerial image shows Battleships Valiant and Queen Elizabeth sunk in shallow water.
Attempted British Deception
British naval command tried to fool the Italians in the days and weeks following the attack by attempting to give the appearance that their commando raid failed. The ships conducted business as usual above deck, receiving visitors and even hosting a band for a holiday concert. During these charades, repair crews worked below the waterline of the crippled ships trying to repair the massive damage. Admiral Sir Andrew Cunningham said of the attack:
We are having shock aftershock out here. The damage to the battleships at this time is a disaster … One cannot but admire the cold-blooded bravery and enterprise of these Italians.
Extensive Damages and Removal From Service
The Queen Elizabeth, the ship that the German Navy surrendered on at the conclusion of World War One, was knocked out of the war for eighteen months undergoing extensive repairs. She re-entered service in January 1944. Additionally, the Valiant required many months of reparations before returning to operational status in August 1942. The Sagona lay disabled for months and the Jervis Bay spent weeks in the docks for repairs. As for the Frogmen themselves, all six spent the duration of the war in British custody; Marceglia and Schergat became captured in Egypt by security forces and never made the rendezvous with the escape sub. The courage of these men is an example of what can be achieved by a small group of determined warriors.
An Opportunity to Change the Course of the War
This strike on Alexandria, along with the success of the two German U-boat attacks, opened a window of opportunity for the Axis in their efforts to support the war in North Africa. The increase in supplies received by Erwin Rommel’s forces helped gain control in the desert battle. Some leaders, including Borghese, felt it was a missed opportunity to exploit the situation. Especially if Germans increased the oil allotment they rationed to the Italian Navy and Air Force. Either way, Decima MAS solidified its reputation as the premier naval Special Forces unit in the world at that time. British Prime Minister Winston Churchill said in admiration of the strike that it showed:
…an unusual example of courage and ability.
Raid on Alexandria was a Materiel and Psychological Victory
Through careful planning, training, courage, and a touch of luck, the Decima Flottiglia MAS attack on Alexandria helped turn the tide, even if only temporarily, for an entire theater of war. The increase in fear and nervousness they brought to Allied sailors after the attack was palpable. Admiral Cunningham said in exasperation:
Everyone has the jitters, seeing objects swimming about at night, and hearing movements on ships’ bottoms. It must stop!
In Allied harbors across the Mediterranean many a sailor suffered through many a restless night. You never knew when and where Decima MAS would strike again.
References:
Frogmen’s First Battles: William Schofield
Secret Agents, Spies, and Saboteurs: Janusz Piekalkiewicz
Underwater Warriors: Paul Kemp
Wikipedia Articles
